Symptoms that point in different directions
What you are seeing narrows the list quickly:
- Air comes out of the vents but it is only slightly cool — often a charge, airflow or coil problem
- Air comes out warm and the outdoor unit is silent — often electrical, a capacitor, a contactor, or a tripped breaker
- Airflow is very weak everywhere — often a clogged filter, a frozen coil, or a blower problem
- The system runs constantly and never satisfies the thermostat — often undercharge, coil fouling, or duct and insulation losses
- Cooling works, then stops after a while, then works again later — often freezing and thawing, or a safety switch cycling the system
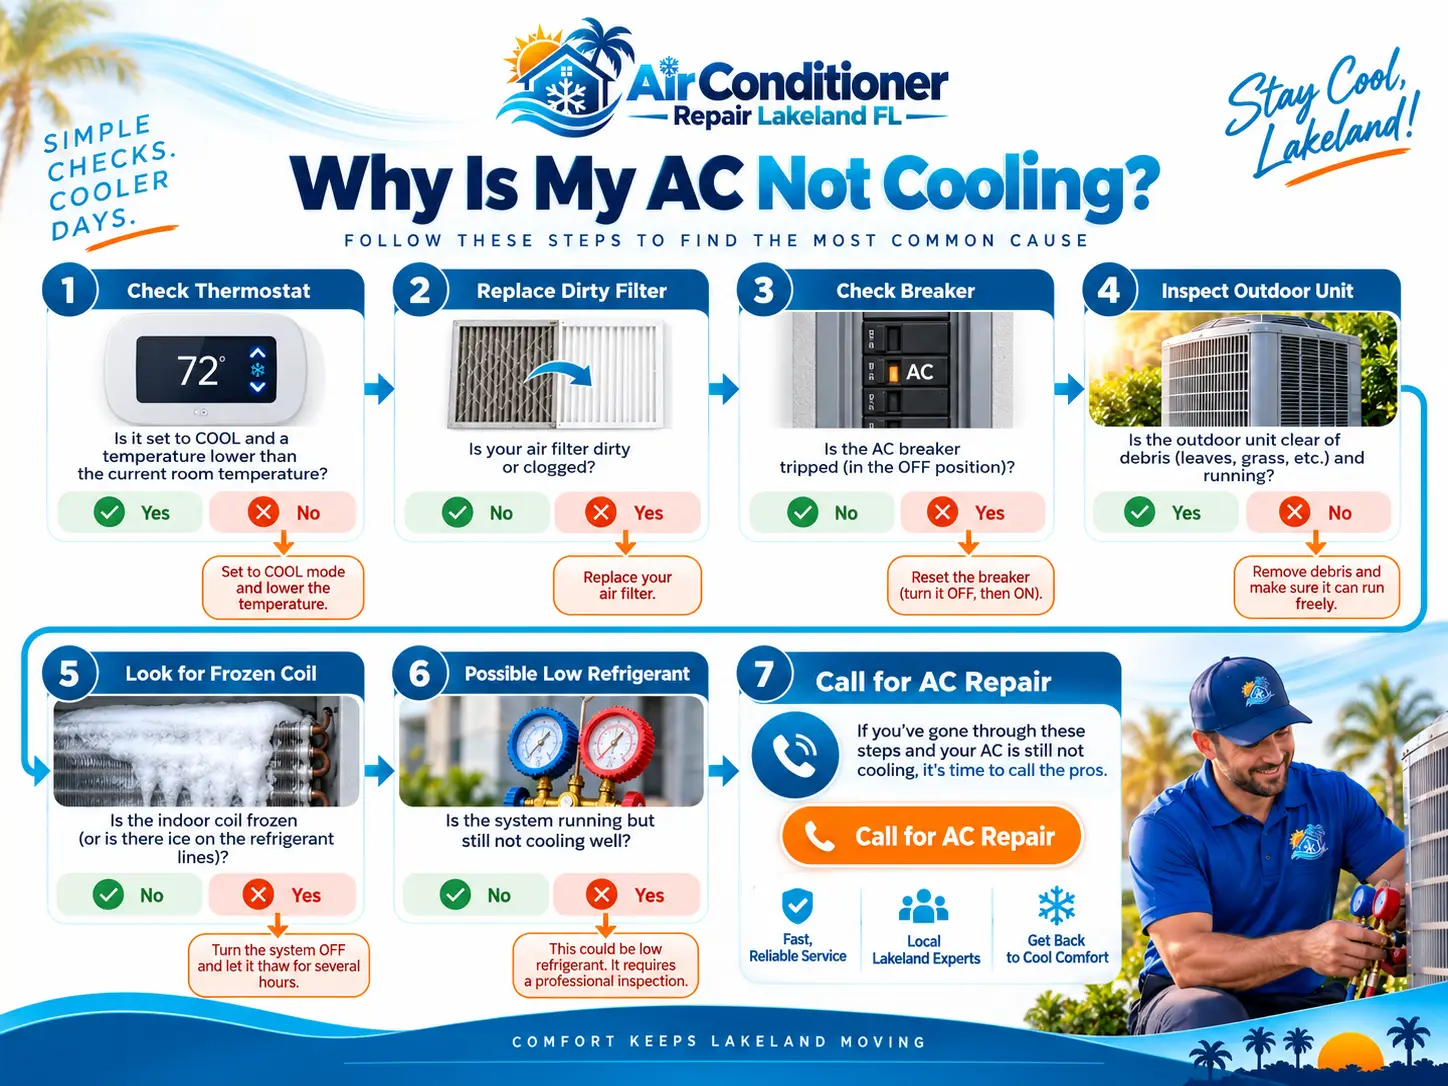
Step 1 — Check the thermostat
Confirm the mode is set to COOL rather than FAN, HEAT or AUTO-changeover, and that the setpoint is several degrees below the current room temperature. Check that the fan is set to AUTO rather than ON — with the fan on continuously, air keeps moving through the vents between cooling cycles and feels warm, which many homeowners read as a cooling failure.
Replace weak batteries in a battery-powered thermostat. If the display is blank, the problem may be a blown low-voltage fuse or a tripped float switch cutting the control circuit, which points to the condensate drain.
Step 2 — Check the air filter
A restricted filter is the most frequent cause of poor cooling that homeowners can fix themselves. Restricted airflow across the evaporator coil drops the coil temperature, reduces capacity, and eventually causes the coil to ice over — which then blocks airflow entirely.
Hold the filter up to a light. If light does not pass through easily, replace it. In Florida's long cooling season, filters often need changing more frequently than the packaging suggests, especially in homes with pets or ongoing construction dust.
Step 3 — Check the breaker and disconnect
Central systems typically have two circuits: one for the indoor air handler and one for the outdoor condensing unit. If the indoor blower runs but the outdoor unit is dead, the outdoor breaker is a prime suspect. A breaker in the tripped position often sits between ON and OFF; push it fully OFF, then back ON, once.
If it trips again, stop. That is an electrical fault, not a nuisance trip, and it needs to be diagnosed before power is restored.
Step 4 — Look at the outdoor condenser
Walk outside while the system is calling for cooling. The fan on top should be spinning and you should hear the compressor. Clear grass clippings, leaves, mulch and vines away from the coil, and make sure nothing is stacked against the cabinet. The outdoor unit rejects heat, and it cannot do that when the coil is blanketed.
A humming outdoor unit with a fan that will not start is a classic failed-capacitor symptom. So is a fan that starts only after you nudge it — do not do that; treat it as a diagnostic clue and call for service instead.
Step 5 — Look for ice
Check the copper refrigerant lines where they enter the house and, if you can see it safely, the indoor coil. Frost or a solid block of ice means the system must be shut off and allowed to thaw before anything else can be evaluated. Ice is a symptom, not a cause: it comes from restricted airflow, a low refrigerant charge, a dirty coil, or a blower problem.
Step 6 — Refrigerant and mechanical causes
If the basics check out, the remaining causes generally require instruments. A low refrigerant charge always means a leak, because a sealed system does not consume refrigerant. Simply adding refrigerant without finding the leak is a temporary measure that repeats every season.
Other mechanical possibilities include a compressor that runs but no longer pumps effectively, a failing reversing valve on heat pump systems, a restricted metering device, or a condenser fan motor that is turning too slowly to reject heat.
Safety note
Do not open high-voltage electrical compartments, do not attempt to discharge or replace a capacitor, do not add refrigerant yourself, and do not bypass float switches, pressure switches or other safety controls. Those devices shut the system down for a reason, and defeating them converts a moderate repair into an expensive one.
What affects the cost of this repair
- Whether the cause turns out to be electrical, airflow-related or sealed-system related
- Diagnostic time when more than one issue is present at the same time
- Whether refrigerant recovery, leak searching and recharging are needed
- Coil cleaning requirements when fouling is contributing
- Age and configuration of the equipment
For broader planning numbers, see the AC repair cost guide for Lakeland or try the repair cost calculator. Both give educational planning ranges rather than quotes.
Questions homeowners ask about this